|
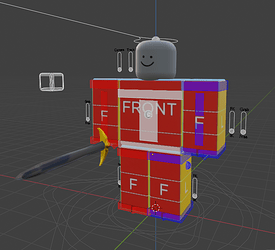
I put together a cool R6 rig for animating in Blender and I figured I’d share it here for anyone who might find it useful since the amount of R6 rigs with both FK and IK on the DevForum are lacking, so I wanted to make the only one you’ll ever need. It supports both IK (Inverse Kinematics) and FK (Forward Kinematics), and you can blend between them with sliders. It has full support for animating tools and any props attached to the rig. Stuff the rig can doIK + FK support for arms and legs Spine bone for more torso movement Sliders to switch between IK/FK and Grabbing and Free move Head follow: yet another slider makes the head look at a target object Grab Points: For grabbing onto stuff like a door handle Very intuitive torso rotation, with UpperTorso, Spine, and LowerTorso all contributing to their own movement Intuitive arm rotation, with UpperArm, LowerArm, Shoulder, and Hand movement all contributing to their own movement just like the torso. Camera follow: even one more slider to make the camera follow the head (good for POV stuff or cutscenes) Separate system for loading characters with Anchor PointsSince the rig uses a custom AnchorPoint method to let you animate tools in blender, characters need to be a little different and have the anchor points built into the character, so this rig comes with a free module that you can put into your game that lets you load the needed parts and stuff into every players character. This does not automatically load any characters, this simply has functions that you call in your own .CharacterLoaded connection CharacterAnchorManager.rbxm (8.9 KB) Example Script: Blender: Roblox Studio:
image_2025-08-25_135914958757×687 274 KB
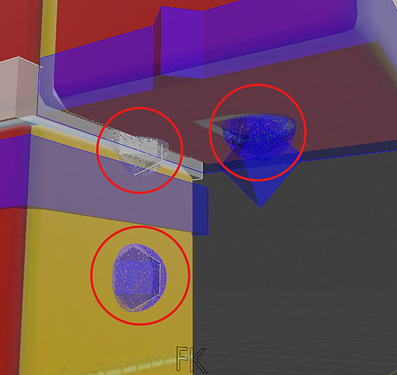
image_2025-04-30_193832460682×736 250 KB Tutorials Adding props/toolsAdding tools that the rig can hold is a straight-forward process, but it does require you to use the studio rig for animating. When you’ve got the rig in blender, you can find AnchorPoints on the Torso, Hip, Thigh, and Hands, they look like blue, red, or white spheres with a hexagon in the middle (or whatever shape that is) Make sure you’re not mistaking the GrabPoints for the AnchorPoints
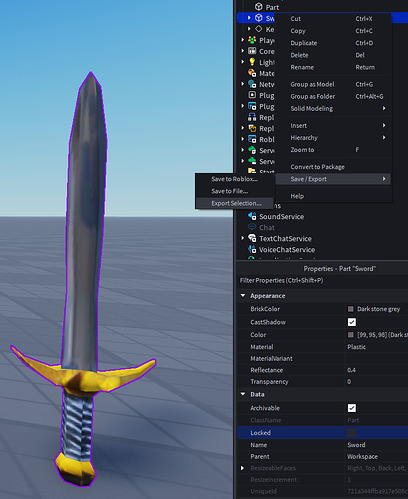
image397×375 39.7 KB Once you’ve located the AnchorPoints, you should import whatever tool you want to be animated, for this example I’m going to be using a sword. Go into Roblox Studio and take your tool, then in the Explorer, right click on the instance and find Export Selection… under Save/Export
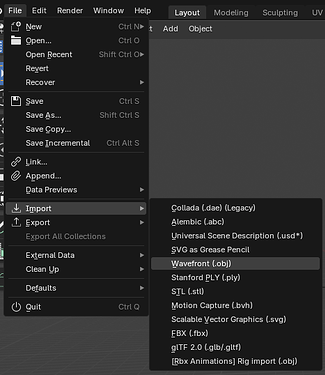
image741×908 151 KB Then export your tool, it will be saved as an .obj file, put the file wherever you want on In Blender with the R6 Rig open, go to File > Import > Wavefront (.obj)
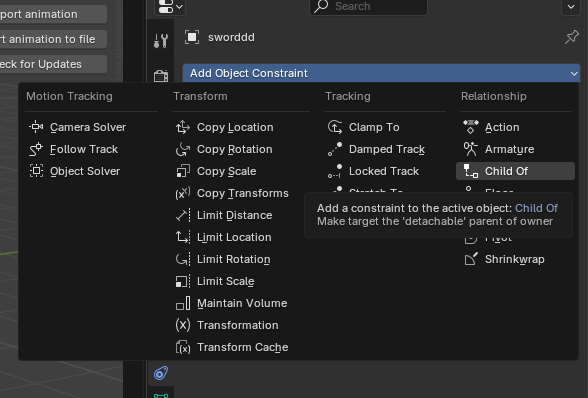
image325×375 33.3 KB Then select your tool in the popup and click Import, and your tool should appear nearby If you don’t see your tool, you might have exported it far away from 0, 0, 0, Your tool should then appear right in the middle of the viewport world Go ahead and move your tool to a position where it would normally be held or just anywhere on one of the AnchorPoints Then select your tool and go to the constraint tab on the right of your screen, and click on Add Object Constraint and search for Child Of
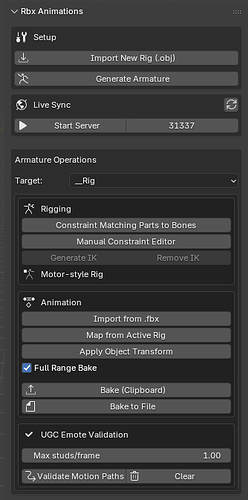
image588×398 39.5 KB Then set the Target to Armature or use the eye dropper tool to select the rig itself (make sure to select the rig and not the body part) Then set the Bone option to whatever AnchorPoint you set the tool to (labeled as RightHand, LeftHand, RightHip, LeftHip, RightThigh, LeftThigh, FrontAnchor, BackAnchor.) Now your tool will follow the AnchorPoint you set it to. You can now enter Pose Mode and animate how you do normally, and you can move the AnchorPoint you have set to the tool and the tool will follow it, assuming you set it up correctly. Once you’ve got your animation, export it using the blender and roblox plugin that is needed to even export the rig. (if you don’t have the plugin, see my comment here: R6 IK + FK Blender Rig - #5 by Aeresei) Then, head back to Roblox Studio Before importing the animation into the rig, make sure you have the tool welded to the associated AnchorPoint you had in blender. You can do this with the RigEdit Plus plugin (which was recently made free) or the Moon Animator Easy Weld to weld the sword to the anchor point, or you can simply add a WeldConstraint with the properties set to have it stay with the AnchorPoint Make sure the tool is NOT anchored Then, go ahead and import your animation onto the rig I provided with the same plugin I said above, and you should see the rig animated as well as the tool! If you intend to use the props/tools to be animated for games, then you MUST use a module that I’ve created and attached to the post, which creates anchor points on every player that joins the game. This does not automatically load any characters, this simply has functions that you call in your own .CharacterLoaded connection The module is above the post in the “Separate system for loading characters with Anchor Points” dropdown ExportingExporting the rig is extremely easy, however if you are animating tools/props, then you must use the special studio rig I have attached in the files above. When you’ve got your animation, you’ll need to use a special plugin made by @CAUTlONED or its outdated version made by @Den_S, either work fine for this rig. For this tutorial, I’ll be using the one made by Cautioned.
image335×673 34.1 KB If you do not have either plugins installed, then you’ll need to do that. Then here: With your animation, you will need to click either “Export animation” or if you’re using the one by Cautioned, you can use “Export animation to file” or use the Live Sync server which exports the animation to Roblox as you animate, this tutorial will not cover Live Sync and will instead cover legacy exporting. Then, in studio, you can use any R6 rig, whether you use the one I provided in this post or one just from the avatar loader that Roblox has, it doesn’t matter and either work. If you’ve added a tool and animated said tool, then you must use the studio rig I have in order to see the item move when loading the animation, if you intend to use the animation of the tool in a game setting, then you will need to use the module script I have created for this exact thing, which loads characters with the Anchor Points, see “Separate system for loading characters with Anchor Points” above. When you have your rig added, open the plugin of your choosing and select the rig, this will set the rig you have to be the main active rig. Then, if you’ve exported through the normal “Export animation” button in the Blender plugin, then you should have a bunch of data copied to your clipboard, so click “Import Animation” in the Roblox plugin, and then press Ctrl+V, if nothing happens then you probably copied something between instances, so just re-export. If you’re using the plugin by Cautioned and used “Export Animation to File” in blender, then you should have a .rbxanim file somewhere on your PC, simply click “Import Animation (file(s) bulk)”, then select the .rbxanim file that you’ve saved. If you’re using 2.0+ of the plugin by Cautioned, then you can use Live Sync by connecting your blender to your studio via HTTPS service in the plugin, see Cautioneds GitHub here to learn how to use Live Sync properly: GitHub - Cautioned/Blender-Animations-Plugin: Addon for Roblox Blender Animation Importing and Exporting From my experience, saving via file is better if you want to save your animation files since it’s faster and you get to keep the animation, however exporting through clipboard is good for one-time animations you don’t intend to edit in the future. However, Live Sync is the fastest and most supportive, though I will not cover how to use it (see link above to Cautioned GitHub) YouTube tutorial video coming soon! Update 1.9:(V2 of this rig will come with an R15 version, same rig, same style, just in R15, but way more intuitive than most of the other rigs you see on the DevForum) This rig is NOT BEGINNER FRIENDLY, you need some knowledge with other Blender R6 rigs as well as general Blender knowledge, it doesn’t take a lot to learn the rig, however I highly recommend NOT using the rig if it’s your first Blender R6 rig, or if you just recently installed Blender. Important Notes Common Mistakes
Attaching items and weapons to the GRAB points instead of the ANCHOR points, the Grab points do NOT export to roblox, they are there so you can lock the arms IK to follow global space instead of being relative to the torso/shoulder, the anchor points will export to Roblox and should be what you attach items and weapons to via Child Of constraints.
Trying to export “_PrimaryArmature” when done with an animation, make sure you are ALWAYS exporting “_Rig” and NOT “_PrimaryArmature”
Using Export Selection... to export shirt and pants UV images, this rig is built for the default Roblox shirt and pants template images and will not work with any images exported using Export Selection... in Roblox Studio.
Mistaking Pose Mode for Object Mode, you’d think this is obvious but I’ve gotten like 4 DMs with this as the issue.
Moving the armature/limbs in Object Mode, despite being able to move the entire rig easily in Object Mode, it’s not recommended if you plan to export the final animation to Roblox, since rigs won’t be in the same location as the animation.
Animating the MasterController normally, while yes you can do this, it isn’t a good idea when dealing with walking or stuff, since the master controller moves everything, you will not have foot-planting animations when animating walking or similar, the MasterController is there so that you can position the rig only once into it’s primary location, like a beginning spot. If you make something cool with it you should post it here, I’d like to see what the other animators are doing
If you have any questions you can message me through discord or email, or you can put a comment under this post (I check DevForum frequently): Discord: @distinguished_duccer |